Social Icons

Wednesday, January 30, 2013

Bubble Blowing Art


Materials Needed: Bubble mixture, Bubble wand, Food coloring, Cups, Paper (Card-stock or thicker paper preferred) 
Instructions:

I did this two different ways. The first time I did this I turned a table on the side and taped a piece of paper to it. I figured if they were blowing bubbles onto the paper this would be the most natural way. However, most of the younger ones had a lot of trouble getting it to reach the paper. However, the kids still had fun and were excited to be able to blow bubbles inside. 

Sunday, January 27, 2013

Homemade Lava Lamps (Video)

Materials needed: Bottle or Jar, Vegetable Oil, Water, Food Coloring, Alka-Seltzer Tablets

Instructions: 
Fill 1/4 of the bottle with water.
Add any color food coloring. We did red to look like lava and then made a blue one. 
Fill the rest of the bottle with Vegetable Oil. 
Allow it to settle for about five minutes. 
The water and oil should be completely separated with the oil on top. The bottles should look something like this. For the red bottle I ran out of Vegetable Oil, you can fill them almost to the top.

Friday, January 25, 2013

Fun Activities for Freezing Weather (VIDEOS)

1. Make Your Own Cloud
Materials needed: Boiling water, cup, temperature under 32 degrees.

We did this when it was 18 degrees outside. Ours ended up looking like a rain cloud.  The kids thought this was really cool. As soon as the water leaves the cup it turns to it's gas form before it hits the ground creating an almost instant cloud. Ours even rained a little after. However, if you do this in temperatures under what we had you will just get the cloud.

Video


Slime Creatures!

Materials needed: Water, two 4oz bottles of glue, 1 tsp of borax, food coloring, bowl.

Instructions: In a medium sized bowl, pour out two bottles of glue. Fill up those two bottles with warm water and pour those in. Add some food coloring and mix well. I used the gel kind of food coloring, but any kind will work. Mix well. 

In a separate cup pour 1/2 cup of water and 1tsp of borax. Mix until the borax dissolves. Pour into slime bowl. Mix with a spoon or tongs until it starts to clump.

Wednesday, January 16, 2013

Vinegar and Baking Soda Art (Mini Volcanoes)


Materials
  • Baking soda
  • Vinegar
  • Food coloring
  • Plates
  • Cups
  • Eye dropper. 
Instructions: Fill up cups half way with vinegar and add a few drops of food coloring. Have your kiddo fill a paper plate with baking soda. I decided to use Styrofoam because it was a little sturdier than a plain paper plate.  

Next, using an eyedropper have your child put drops onto the baking soda. They will enjoy watching and listening to the reaction. 

Tuesday, January 15, 2013

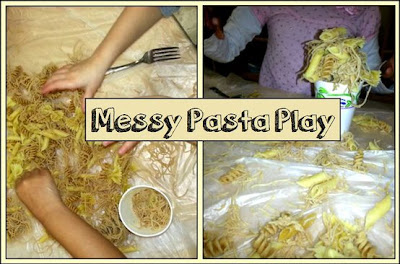
Pasta Play (Sensory Table)


Alright..kids will either really love this activity or hate it! My classroom was about half and half. I took a bunch of different types of pasta and cooked them. I left some uncooked, for a different texture. I gave the kids some forks to twirl the pasta with, along with some different sized cups. Most of the kids ended up making an ice cream stand that sold different types of ice cream. For easy clean up- tape a trash bag to the table. Simply wrap it up and throw it away after.

Friday, January 11, 2013

How to Make Your Own Memory Game

Recycle your old bottle caps!
Make your own memory game using recycled bottle caps  Kids can put whatever objects inside to match and decorate the tops however they want.

Materials: 
  • Bottle caps
  • Paint
  • Glue
  • Small items for matching

Snowflake Tutorial

I was surprised at how many people did not know how to make snowflakes! Most of the ones I've seen around just look like squares. Here's how to do them!

Lilly's Purple Plastic Purse Activity

Make your own plastic purple purse! 
Materials needed: 
  • Small plastic sandwich bag. (Not the sealed kind, you need the flap kind)
  •  Construction Paper
  • Tape
  • Markers
  • Glue
  • Scissors
Instructions: Read Kevin Henkes' Lilly's Purple Plastic Purse to your child. Then have the child trace around a sandwich bag on the purple construction paper. Cut out slightly smaller so that you can fit it into the bag, do twice. Measure the flap of the bag and cut out a purple piece that will fit, add a white button out of construction paper. Cut out a handle shape and tape to back. I added clear tape over the top of my handle to give it a little more weight. 

Thursday, January 10, 2013

Drawing with Shaving Cream


Tried this out with the kids today. They loved it. I only had one big piece of foam, so I sliced it in half and had two kids at a time. Other kids were so interested I had to let them do it on other tables, without the foam paper. For kids who don't like to get their hands messy or kids who don't like the texture of shaving cream- this whole project can be done in a big Ziploc bag.


Tuesday, January 8, 2013

Sailboats in a Jar


So, I found this idea in a craft book for preschoolers. I was beyond excited to make this with them because I knew they'd like taking it home. However, when I did my test run I could not get the sailboat to stay upright at all. It kept tipping to one side regardless of what I did. 

I went home, tried a few different things and finally found something that worked. Instead of using a magnet and a straw, I used two magnets and two paper clips. Now, even after shaking the jar my boat continues to readjust and float perfectly back up. 


Sunday, January 6, 2013

Glitter Shakers for Kids

Glitter Shakers
Saw this idea on Pinterest and had to try it out. I found mini salt and pepper shakers at Michaels for 25 cents each. I bought a bunch and filled them with different glitter colors. This works perfectly for young kids who usually end up dumping half the bottle out. It's perfect for tiny hands and teaches kids to use glitter in moderation.

Perler Beads Necklace

Materials needed
  • Perler beads
  • Perler bead templates
  • Iron
  • Wax paper
Directions: Have the kids put the beads in whatever pattern they like. Make sure all the beads connect some way. Cover with wax paper, iron until beads melt together. Immediately peel of of wax paper so that it doesn't stick to the back of the beads, let cool and put string through it for a necklace.

10 Spy Bottles Ideas


Wednesday, January 30, 2013

Bubble Blowing Art


Materials Needed: Bubble mixture, Bubble wand, Food coloring, Cups, Paper (Card-stock or thicker paper preferred) 
Instructions:

I did this two different ways. The first time I did this I turned a table on the side and taped a piece of paper to it. I figured if they were blowing bubbles onto the paper this would be the most natural way. However, most of the younger ones had a lot of trouble getting it to reach the paper. However, the kids still had fun and were excited to be able to blow bubbles inside. 

Sunday, January 27, 2013

Homemade Lava Lamps (Video)

Materials needed: Bottle or Jar, Vegetable Oil, Water, Food Coloring, Alka-Seltzer Tablets

Instructions: 
Fill 1/4 of the bottle with water.
Add any color food coloring. We did red to look like lava and then made a blue one. 
Fill the rest of the bottle with Vegetable Oil. 
Allow it to settle for about five minutes. 
The water and oil should be completely separated with the oil on top. The bottles should look something like this. For the red bottle I ran out of Vegetable Oil, you can fill them almost to the top.

Friday, January 25, 2013

Fun Activities for Freezing Weather (VIDEOS)

1. Make Your Own Cloud
Materials needed: Boiling water, cup, temperature under 32 degrees.

We did this when it was 18 degrees outside. Ours ended up looking like a rain cloud.  The kids thought this was really cool. As soon as the water leaves the cup it turns to it's gas form before it hits the ground creating an almost instant cloud. Ours even rained a little after. However, if you do this in temperatures under what we had you will just get the cloud.

Video


Slime Creatures!

Materials needed: Water, two 4oz bottles of glue, 1 tsp of borax, food coloring, bowl.

Instructions: In a medium sized bowl, pour out two bottles of glue. Fill up those two bottles with warm water and pour those in. Add some food coloring and mix well. I used the gel kind of food coloring, but any kind will work. Mix well. 

In a separate cup pour 1/2 cup of water and 1tsp of borax. Mix until the borax dissolves. Pour into slime bowl. Mix with a spoon or tongs until it starts to clump.

Wednesday, January 16, 2013

Vinegar and Baking Soda Art (Mini Volcanoes)


Materials
  • Baking soda
  • Vinegar
  • Food coloring
  • Plates
  • Cups
  • Eye dropper. 
Instructions: Fill up cups half way with vinegar and add a few drops of food coloring. Have your kiddo fill a paper plate with baking soda. I decided to use Styrofoam because it was a little sturdier than a plain paper plate.  

Next, using an eyedropper have your child put drops onto the baking soda. They will enjoy watching and listening to the reaction. 

Tuesday, January 15, 2013

Pasta Play (Sensory Table)


Alright..kids will either really love this activity or hate it! My classroom was about half and half. I took a bunch of different types of pasta and cooked them. I left some uncooked, for a different texture. I gave the kids some forks to twirl the pasta with, along with some different sized cups. Most of the kids ended up making an ice cream stand that sold different types of ice cream. For easy clean up- tape a trash bag to the table. Simply wrap it up and throw it away after.

Friday, January 11, 2013

How to Make Your Own Memory Game

Recycle your old bottle caps!
Make your own memory game using recycled bottle caps  Kids can put whatever objects inside to match and decorate the tops however they want.

Materials: 
  • Bottle caps
  • Paint
  • Glue
  • Small items for matching

Snowflake Tutorial

I was surprised at how many people did not know how to make snowflakes! Most of the ones I've seen around just look like squares. Here's how to do them!

Lilly's Purple Plastic Purse Activity

Make your own plastic purple purse! 
Materials needed: 
  • Small plastic sandwich bag. (Not the sealed kind, you need the flap kind)
  •  Construction Paper
  • Tape
  • Markers
  • Glue
  • Scissors
Instructions: Read Kevin Henkes' Lilly's Purple Plastic Purse to your child. Then have the child trace around a sandwich bag on the purple construction paper. Cut out slightly smaller so that you can fit it into the bag, do twice. Measure the flap of the bag and cut out a purple piece that will fit, add a white button out of construction paper. Cut out a handle shape and tape to back. I added clear tape over the top of my handle to give it a little more weight. 

Thursday, January 10, 2013

Drawing with Shaving Cream


Tried this out with the kids today. They loved it. I only had one big piece of foam, so I sliced it in half and had two kids at a time. Other kids were so interested I had to let them do it on other tables, without the foam paper. For kids who don't like to get their hands messy or kids who don't like the texture of shaving cream- this whole project can be done in a big Ziploc bag.


Tuesday, January 8, 2013

Sailboats in a Jar


So, I found this idea in a craft book for preschoolers. I was beyond excited to make this with them because I knew they'd like taking it home. However, when I did my test run I could not get the sailboat to stay upright at all. It kept tipping to one side regardless of what I did. 

I went home, tried a few different things and finally found something that worked. Instead of using a magnet and a straw, I used two magnets and two paper clips. Now, even after shaking the jar my boat continues to readjust and float perfectly back up. 


Sunday, January 6, 2013

Glitter Shakers for Kids

Glitter Shakers
Saw this idea on Pinterest and had to try it out. I found mini salt and pepper shakers at Michaels for 25 cents each. I bought a bunch and filled them with different glitter colors. This works perfectly for young kids who usually end up dumping half the bottle out. It's perfect for tiny hands and teaches kids to use glitter in moderation.

Perler Beads Necklace

Materials needed
  • Perler beads
  • Perler bead templates
  • Iron
  • Wax paper
Directions: Have the kids put the beads in whatever pattern they like. Make sure all the beads connect some way. Cover with wax paper, iron until beads melt together. Immediately peel of of wax paper so that it doesn't stick to the back of the beads, let cool and put string through it for a necklace.

10 Spy Bottles Ideas